-
Nos dirijiremos a la página oficial de debian para descargar la ISO de debian que usaremos en nuestro caso debian 11.
alejandrogv@AlejandroGV:~/Escritorio/ISOS$ ls ... debian-11.0.0-amd64-netinst.iso ... -
Montaremos esta imagen en una carpeta donde elijamos para después modificar su contenido
alejandrogv@AlejandroGV:~/Escritorio/ISOS$ sudo mount -o loop debian-11.0.0-amd64-netinst.iso preseed/ alejandrogv@AlejandroGV:~/Escritorio/ISOS$ ls preseed/ autorun.inf dists g2ldr isolinux README.html README.txt boot doc g2ldr.mbr md5sum.txt README.mirrors.html setup.exe css EFI install pics README.mirrors.txt tools debian firmware install.amd pool README.source win32-loader.ini -
De todos los ficheros y carpetas que aparecen en la imagen anterior solo necesitamos algunos para realizar una instalacioón desatendida. Crearemos otra carpeta donde moveremos solo los archivos necesarios.
alejandrogv@AlejandroGV:~/Escritorio/ISOS/desatendida$ sudo cp -pr ../preseed/install.amd . alejandrogv@AlejandroGV:~/Escritorio/ISOS/desatendida$ sudo cp -pr ../preseed/dists . alejandrogv@AlejandroGV:~/Escritorio/ISOS/desatendida$ sudo cp -pr ../preseed/pool . alejandrogv@AlejandroGV:~/Escritorio/ISOS/desatendida$ sudo cp -pr ../preseed/.disk . alejandrogv@AlejandroGV:~/Escritorio/ISOS/desatendida$ sudo cp -pr ../preseed/isolinux . alejandrogv@AlejandroGV:~/Escritorio/ISOS/desatendida$ ln -s .debian -
Ahora crearemos un fichero preseed donde indicaremos toda la configuración que necesitamos en nuestra imagen que tendrá el siguiente contenido donde podremos configurar cosas como el usuario y contraseña que tendrá nuestro sistema o los diferentes parametros para que nuestra instalación sea completamente desatendida.
### Localization.Aunque lo modificamos, la selección de pais e idioma ya está automatizada en el txt.cfg, por lo que en este apartado ### podriamos dejarlo sin cambiar. # Preseeding only locale sets language, country and locale. d-i debian-installer/locale string es_ES # The values can also be preseeded individually for greater flexibility. d-i debian-installer/language string spanish d-i debian-installer/country string Spain d-i debian-installer/locale string es_ES.UTF-8 # Optionally specify additional locales to be generated. d-i localechooser/supported-locales es_ES.UTF-8 # Keyboard selection.Con el teclado ocurre lo mismo que en el apartado anterior, ya esta predefinido. # keymap is an alias for keyboard-configuration/xkb-keymap d-i keyboard-configuration/toggle select No toggling d-i keymap select es # Disable automatic (interactive) keymap detection. d-i console-setup/ask_detect boolean true d-i keyboard-configuration/modelcode string pc105 d-i keyboard-configuration/layoutcode string es # To select a variant of the selected layout (if you leave this out, the # basic form of the layout will be used): d-i keyboard-configuration/variantcode string dvorak ### Network configuration. Configuracion de red. Dejamos la red deshabilitada para que la instalacion sea a partir del DVD. # Disable network configuration entirely. This is useful for cdrom # installations on non-networked devices where the network questions, # warning and long timeouts are a nuisance. # netcfg will choose an interface that has link if possible. This makes it # skip displaying a list if there is more than one interface. d-i netcfg/choose_interface select auto # Any hostname and domain names assigned from dhcp take precedence over # values set here. However, setting the values still prevents the questions # Establecemos un hostname y un dominio para que no se nos pregunte ya que cualquier valor asignado por el dhcp sobreescribirá estos. d-i netcfg/get_hostname string PruebaPreseed d-i netcfg/get_domain string blanco ### Mirror settings. Las modificaciones marcadas las extraera del DVD. # If you select ftp, the mirror/country string does not need to be set. d-i mirror/country string manual d-i mirror/http/hostname string ftp.es.debian.org d-i mirror/http/directory string /debian d-i mirror/http/proxy string ### Clock and time zone setup. Fecha y hora.En este punto le indicamos para que pais debe tomar la hora y la fecha. # Controls whether or not the hardware clock is set to UTC. d-i clock-setup/utc boolean true # You may set this to any valid setting for $TZ; see the contents of # /usr/share/zoneinfo/ for valid values. d-i time/zone string ES/Madrid # Controls whether to use NTP to set the clock during the install d-i clock-setup/ntp boolean true ### Partitioning. Particiones y formato.Seleccionamos el modo regular y atomic.Indicamos aquí que tome todo el disco, y haga las particiones ##comunes para el funcionamiento del sistema utilizando todo el espacio disponible en el disco duro. ## Partitioning example # If the system has free space you can choose to only partition that space. # This is only honoured if partman-auto/method (below) is not set. # Alternatives: custom, some_device, some_device_crypto, some_device_lvm. d-i partman-auto/init_automatically_partition select biggest_free # Alternatively, you may specify a disk to partition. If the system has only # one disk the installer will default to using that, but otherwise the device # name must be given in traditional, non-devfs format (so e.g. /dev/hda or # /dev/sda, and not e.g. /dev/discs/disc0/disc). # For example, to use the first SCSI/SATA hard disk: # In addition, you’ll need to specify the method to use. # The presently available methods are: # – regular: use the usual partition types for your architecture # – lvm: use LVM to partition the disk # – crypto: use LVM within an encrypted partition d-i partman-auto/method string regular # You can choose one of the three predefined partitioning recipes: # – atomic: all files in one partition # – home: separate /home partition # – multi: separate /home, /usr, /var, and /tmp partitions d-i partman-auto/choose_recipe select atomic # This makes partman automatically partition without confirmation, provided # that you told it what to do using one of the methods above. d-i partman-partitioning/confirm_write_new_label boolean true d-i partman/choose_partition select finish d-i partman/confirm boolean true d-i partman/confirm_nooverwrite boolean true # This makes partman automatically partition without confirmation. d-i partman-md/confirm boolean true d-i partman-partitioning/confirm_write_new_label boolean true d-i partman/choose_partition select finish d-i partman/confirm boolean true d-i partman/confirm_nooverwrite boolean true d-i passwd/root-password password 56360752 d-i passwd/root-password-again password 56360752 popularity-contest popularity-contest/participate boolean false ### Account setup Cuentas de usuario y contraseñas. Definimos en este punto nombre de usuario y contraseña. # To create a normal user account. d-i passwd/user-fullname string alejandro d-i passwd/username string alejandro # Normal user’s password, either in clear text d-i passwd/user-password password prueba d-i passwd/user-password-again password prueba # Set to true if you want to encrypt the first user’s home directory. ##Selecionamos si queremos que encripte la carpete de usuario d-i user-setup/encrypt-home boolean false ### Package selection. Seleccion de paquetes. tasksel tasksel/first multiselect ubuntu-desktop ### Boot loader installation. Instalación del arranque de la distro. # Grub is the default boot loader (for x86). If you want lilo installed # instead, uncomment this: # d-i grub-installer/skip boolean true d-i apt-setup/use_mirror boolean true d-i apt-setup/services-select multiselect security, updates d-i apt-setup/security_host string security.debian.org d-i apt-setup/local0/repository string \ http://local.server/debian stable main d-i apt-setup/local0/comment string local server d-i apt-setup/local0/source boolean true d-i apt-setup/multiarch string i386 # To also skip installing lilo, and install no bootloader, uncomment this # too: # d-i lilo-installer/skip boolean true # With a few exceptions for unusual partitioning setups, GRUB 2 is now the # default. If you need GRUB Legacy for some particular reason, then # uncomment this: # d-i grub-installer/grub2_instead_of_grub_legacy boolean true # This is fairly safe to set, it makes grub install automatically to the MBR # if no other operating system is detected on the machine. d-i grub-installer/only_debian boolean true # This one makes grub-installer install to the MBR if it also finds some other # OS, which is less safe as it might not be able to boot that other OS. d-i grub-installer/with_other_os boolean true d-i grub installer/bootdev string /dev/sda ### Finishing up the installation. Finalizar la instalación. # Avoid that last message about the install being complete. # Linea para saltarse el aviso de que la instalación esta completa y que va a reiniciar. d-i finish-install/reboot_in_progress note # Monitor autodetection is recommended. xserver-xorg xserver-xorg/autodetect_monitor boolean true # Uncomment if you have an LCD display. #xserver-xorg xserver-xorg/config/monitor/lcd boolean true # X has three configuration paths for the monitor. Here’s how to preseed # the «medium» path, which is always available. The «simple» path may not # be available, and the «advanced» path asks too many questions. xserver-xorg xserver-xorg/config/monitor/selection-method \ select medium xserver-xorg xserver-xorg/config/monitor/mode-list \ select 1024×768 @ 60 Hz -
Ahora debemos crear una carpeta llamada
respuestasy añadir este fichero dentro de ella.alejandrogv@AlejandroGV:~/Escritorio/ISOS/desatendida$ mkdir respuestas alejandrogv@AlejandroGV:~/Escritorio/ISOS/desatendida$ mv preseed.cfg respuestas/ -
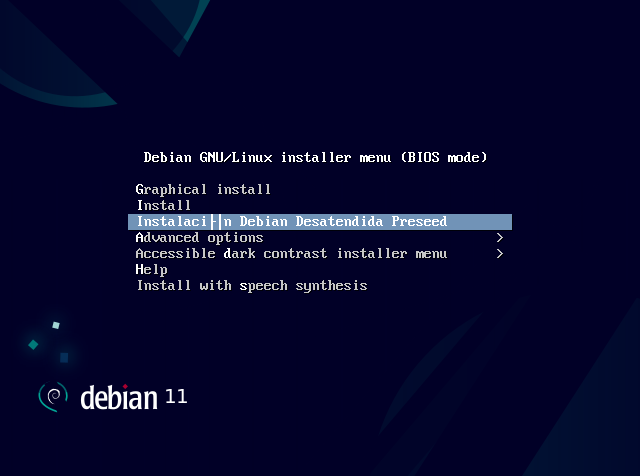
Ahora dentro de la carpeta que copiamos anteriormente
isolinuxsustituiremos el contenido del ficherotxt.cfgpor el que aparece a continuación.default install label install menu label ^Install kernel /install.amd/vmlinuz append vga=788 initrd=/install.amd/initrd.gz -- quiet label unattended-gnome menu label ^Instalación Debian Desatendida Preseed kernel /install.amd/gtk/vmlinuz append vga=788 initrd=/install.amd/gtk/initrd.gz preseed/file=/cdrom/respuestas/preseed.cfg locale=es_ES console-setup/ask_detect=false keyboard-configuration xkb-keymap=es -- -
El siguiente paso será generar la imagen ISO a partir de este directorio usando
genisoimage.alejandrogv@AlejandroGV:~/Escritorio/ISOS$ sudo genisoimage -o debian-preseed.iso -l -r -J -no-emul-boot -boot-load-size 4 -boot-info-table -b isolinux/isolinux.bin -c isolinux/boot.cat desatendida I: -input-charset not specified, using utf-8 (detected in locale settings) Size of boot image is 4 sectors -> No emulation 2.31% done, estimate finish Mon Sep 27 10:53:29 2021 4.62% done, estimate finish Mon Sep 27 10:53:50 2021 6.93% done, estimate finish Mon Sep 27 10:53:57 2021 9.24% done, estimate finish Mon Sep 27 10:53:50 2021 11.54% done, estimate finish Mon Sep 27 10:53:54 2021 13.85% done, estimate finish Mon Sep 27 10:53:57 2021 16.16% done, estimate finish Mon Sep 27 10:53:59 2021 18.46% done, estimate finish Mon Sep 27 10:53:56 2021 20.78% done, estimate finish Mon Sep 27 10:53:57 2021 23.08% done, estimate finish Mon Sep 27 10:53:59 2021 25.39% done, estimate finish Mon Sep 27 10:54:00 2021 27.70% done, estimate finish Mon Sep 27 10:53:57 2021 30.00% done, estimate finish Mon Sep 27 10:53:58 2021 32.31% done, estimate finish Mon Sep 27 10:53:56 2021 34.62% done, estimate finish Mon Sep 27 10:53:57 2021 36.93% done, estimate finish Mon Sep 27 10:53:56 2021 39.24% done, estimate finish Mon Sep 27 10:53:57 2021 41.55% done, estimate finish Mon Sep 27 10:53:55 2021 43.85% done, estimate finish Mon Sep 27 10:53:56 2021 46.16% done, estimate finish Mon Sep 27 10:53:54 2021 48.47% done, estimate finish Mon Sep 27 10:53:55 2021 50.78% done, estimate finish Mon Sep 27 10:53:54 2021 53.08% done, estimate finish Mon Sep 27 10:53:53 2021 55.39% done, estimate finish Mon Sep 27 10:53:52 2021 57.70% done, estimate finish Mon Sep 27 10:53:51 2021 60.01% done, estimate finish Mon Sep 27 10:53:52 2021 62.32% done, estimate finish Mon Sep 27 10:53:53 2021 64.62% done, estimate finish Mon Sep 27 10:53:52 2021 66.93% done, estimate finish Mon Sep 27 10:53:51 2021 69.24% done, estimate finish Mon Sep 27 10:53:52 2021 71.55% done, estimate finish Mon Sep 27 10:53:52 2021 73.86% done, estimate finish Mon Sep 27 10:53:54 2021 76.17% done, estimate finish Mon Sep 27 10:53:57 2021 78.47% done, estimate finish Mon Sep 27 10:53:58 2021 80.78% done, estimate finish Mon Sep 27 10:53:57 2021 83.09% done, estimate finish Mon Sep 27 10:53:56 2021 85.39% done, estimate finish Mon Sep 27 10:53:55 2021 87.71% done, estimate finish Mon Sep 27 10:53:55 2021 90.01% done, estimate finish Mon Sep 27 10:53:55 2021 92.32% done, estimate finish Mon Sep 27 10:53:54 2021 94.63% done, estimate finish Mon Sep 27 10:53:54 2021 96.94% done, estimate finish Mon Sep 27 10:53:53 2021 99.25% done, estimate finish Mon Sep 27 10:53:54 2021 Total translation table size: 2048 Total rockridge attributes bytes: 174695 Total directory bytes: 948224 Path table size(bytes): 7486 Max brk space used 1aa000 216649 extents written (423 MB) -
Ahora comprobamos que funciona haciendo una instalación a partir de esta imagen y usando la opción instalación desatendida.