El escenario que debemos montar es el siguiente:
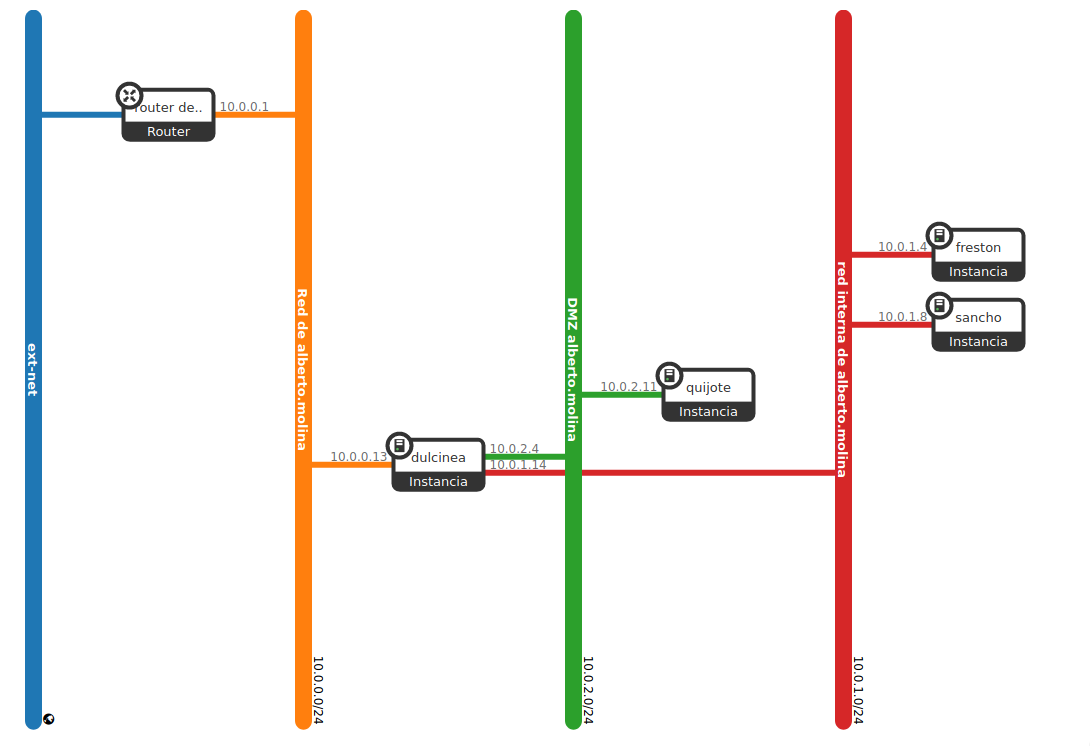
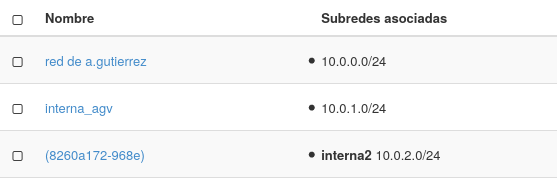
Nosotros tenemos nuestra propia red, pero debemos crear dos nuevas para el escenario y añadir las redes conrrespondientes a sus máquinas
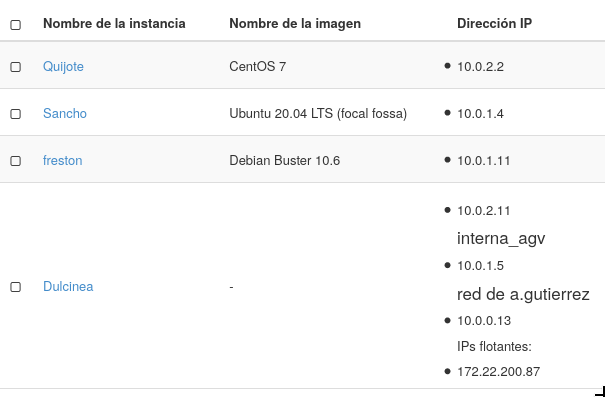
Nuestro siguiente paso será deshabilitar los puertos de Dulcinea que será la máquina que usaremos para conectarnos a las demás y salir al exterior Para este proposito usaremos OpenStack Client alejandrogv@AlejandroGV:~$ source Escritorio/ASIR/hlc/openstackclient/bin/activate source ~/Descargas/Proyecto\ de\ a.gutierrez-openrc.sh
Ahora listaremos las interfaces que tenemos en nuestro proyecto
    (openstackclient) alejandrogv@AlejandroGV:~$ openstack port list
    +--------------------------------------+--------------------------------------+-------------------      +--------------------------------------------------------------------------+--------+
    | ID                                   | Name                                 | MAC Address       | Fixed IP        Addresses                                                       | Status |
    +--------------------------------------+--------------------------------------+-------------------      +--------------------------------------------------------------------------+--------+
    | 133d2510-b5f6-4011-9110-6e7fd159237c |                                      | fa:16:3e:9f:a6:1c | ip_address='10.0.0.2',      subnet_id='5c91deaa-5bf8-4e8a-9522-0f44c4b98c54'  | ACTIVE |
    | 1fe6f81a-9754-492a-9c2f-5b989626e39d |                                      | fa:16:3e:04:82:c7 | ip_address='10.0.2.11',         subnet_id='1ec6804d-248b-4eef-bf2e-0d37550894d0' | ACTIVE |
    | 2d806a4d-7a7a-47af-b24d-9821f94c93ce |                                      | fa:16:3e:8f:31:60 | ip_address='10.0.0.1',      subnet_id='5c91deaa-5bf8-4e8a-9522-0f44c4b98c54'  | ACTIVE |
    | 3fd1ff15-8a86-4374-ab6b-5e946e9721c0 |                                      | fa:16:3e:2c:a0:e1 | ip_address='10.0.2.2',      subnet_id='1ec6804d-248b-4eef-bf2e-0d37550894d0'  | ACTIVE |
    | 7861e5ff-fc23-41fb-b70f-f6eddd41aa02 |                                      | fa:16:3e:1a:09:67 | ip_address='10.0.1.2',      subnet_id='48bf0175-ef57-43e8-882f-7bfa45e599b9'  | ACTIVE |
    | a0c78cf2-c56f-4096-a76e-1a2ec922e7e6 | iptables-r1_network_ext-vidmj5ufbecn | fa:16:3e:22:5c:6b | ip_address='10.0.0.5',      subnet_id='5c91deaa-5bf8-4e8a-9522-0f44c4b98c54'  | DOWN   |
    | a4442c16-33c2-4dd3-baee-dd7d57e8d068 |                                      | fa:16:3e:09:7b:f3 | ip_address='10.0.2.1',      subnet_id='1ec6804d-248b-4eef-bf2e-0d37550894d0'  | ACTIVE |
    | a7c4213b-d224-4d2f-8cf1-1f8770ef7823 |                                      | fa:16:3e:8b:3f:fb | ip_address='10.0.1.4',      subnet_id='48bf0175-ef57-43e8-882f-7bfa45e599b9'  | ACTIVE |
    | bcd125ee-f87e-4d48-9db2-0d903213ddb3 |                                      | fa:16:3e:91:36:7c | ip_address='10.0.0.13',         subnet_id='5c91deaa-5bf8-4e8a-9522-0f44c4b98c54' | ACTIVE |
    | be9eda79-87da-4a45-9b33-36793c42993b |                                      | fa:16:3e:4a:4c:1e | ip_address='10.0.1.11',         subnet_id='48bf0175-ef57-43e8-882f-7bfa45e599b9' | ACTIVE |
    | cb13e01e-b2b7-47fa-9c26-207cab410f0b |                                      | fa:16:3e:93:93:63 | ip_address='10.0.1.5',      subnet_id='48bf0175-ef57-43e8-882f-7bfa45e599b9'  | ACTIVE |
    +--------------------------------------+--------------------------------------+-------------------      +--------------------------------------------------------------------------+--------+
Por último para deshabilitar la seguridad de los puertos haremos esto:
openstack port set --disable-port-security [id de la interfaz]
Una vez terminado este paso entraremos a Dulcinea y activaremos el bit de enrutamiento en “/etc/sysctl.conf”, nuestro primer paso para hacer NAT
    # Uncomment the next line to enable packet forwarding for IPv4
    net.ipv4.ip_forward=1
Para asegurarnos ejecutamos el siguiente comando también:
echo 1 > /proc/sys/net/ipv4/ip_forward
Añadiremos las reglas de IPTABLES
    debian@dulcinea:~$ sudo iptables -t nat -A POSTROUTING -s 10.0.1.0/24 -o eth0 -j MASQUERADE
    debian@dulcinea:~$ sudo iptables -t nat -A POSTROUTING -s 10.0.2.0/24 -o eth0 -j MASQUERADE
Y guardamos estás reglas para que persistan si reiniciamos la máquina
debian@dulcinea:~$ sudo iptables-save
Nuestro siguiente paso en Dulcinea será modificar el fichero “/etc/network/interfaces”
    # The normal eth0
    auto eth0
    iface eth0 inet static
     address 10.0.0.13
     netmask 255.255.255.0
     broadcast 10.0.0.255

    # Additional interfaces, just in case we're using
    # multiple networks
    auto eth1
    iface eth1 inet static
     address 10.0.1.5
     netmask 255.255.255.0
     broadcast 10.0.1.255
     gateway 10.0.1.1

    auto eth2
    iface eth2 inet static
     address 10.0.2.11
     netmask 255.255.255.0
     broadcast 10.0.2.255
     gateway 10.0.2.1
Reiniciamos el servicio de red y podemos empezar a configurar nuestras máquinas. Empezaremos por CentOS, Quijote, El archivo que tendremos que configurar es “etc/sysconfig/network-scripts/ifcfg-eth0”
    # Created by cloud-init on instance boot automatically, do not edit.
    #
    BOOTPROTO=static
    DEVICE=eth0
    IPADDR=10.0.2.2
    NETMASK=255.255.255.0
    NETWORK=10.0.2.0
    GATEWAY=10.0.2.11
    HWADDR=fa:16:3e:2c:a0:e1
    ONBOOT=yes
    STARTMODE=auto
    TYPE=Ethernet
    USERCTL=no
Para probar su conectividad haremos ping a 8.8.8.8, a Dulcinea y a www.google.es para comprobar que funciona el DNS
    [centos@quijote ~]$ ping 8.8.8.8
    PING 8.8.8.8 (8.8.8.8) 56(84) bytes of data.
    64 bytes from 8.8.8.8: icmp_seq=1 ttl=111 time=43.1 ms

    --- 8.8.8.8 ping statistics ---
    1 packets transmitted, 1 received, 0% packet loss, time 0ms
    rtt min/avg/max/mdev = 43.123/43.123/43.123/0.000 ms
    [centos@quijote ~]$ ping 10.0.2.11
    PING 10.0.2.11 (10.0.2.11) 56(84) bytes of data.
    64 bytes from 10.0.2.11: icmp_seq=1 ttl=64 time=0.439 ms

    --- 10.0.2.11 ping statistics ---
    1 packets transmitted, 1 received, 0% packet loss, time 0ms
    rtt min/avg/max/mdev = 0.439/0.439/0.439/0.000 ms
    [centos@quijote ~]$ ping www.google.es
    PING www.google.es (172.217.168.163) 56(84) bytes of data.
    64 bytes from mad07s10-in-f3.1e100.net (172.217.168.163): icmp_seq=1 ttl=112 time=43.2 ms
Pasaremos a configurar freston, como es debian el archivo de configuración está en “/etc/network/interfaces”
    # The normal eth0
    auto eth0
    iface eth0 inet static
     address 10.0.1.9
     netmask 255.255.255.0
     broadcast 10.0.1.255
     gateway 10.0.1.5
Haremos las mismas pruebas que con freston
    debian@freston:~$ ping 10.0.1.5
    PING 10.0.1.5 (10.0.1.5) 56(84) bytes of data.
    64 bytes from 10.0.1.5: icmp_seq=1 ttl=64 time=0.305 ms

    --- 10.0.1.5 ping statistics ---
    1 packets transmitted, 1 received, 0% packet loss, time 0ms
    rtt min/avg/max/mdev = 0.305/0.305/0.305/0.000 ms
    debian@freston:~$ ping 8.8.8.8
    PING 8.8.8.8 (8.8.8.8) 56(84) bytes of data.
    64 bytes from 8.8.8.8: icmp_seq=1 ttl=111 time=43.1 ms

    --- 8.8.8.8 ping statistics ---
    1 packets transmitted, 1 received, 0% packet loss, time 0ms
    rtt min/avg/max/mdev = 43.101/43.101/43.101/0.000 ms
    debian@freston:~$ ping www.google.es
    PING www.google.es (142.250.185.3) 56(84) bytes of data.
    64 bytes from mad41s11-in-f3.1e100.net (142.250.185.3): icmp_seq=1 ttl=111 time=42.9 ms

    --- www.google.es ping statistics ---
    1 packets transmitted, 1 received, 0% packet loss, time 0ms
    rtt min/avg/max/mdev = 42.895/42.895/42.895/0.000 ms
La última máquina que configuraremos será Sancho, al ser ubuntu su archivo de configuarción se encuentra en “/etc/netplan/50-cloud-init.yaml”
    network:
    version: 2
    ethernets:
            ens4:
                dhcp4: false
                match:
                    macaddress: fa:16:3e:8b:3f:fb
                mtu: 8950
                set-name: ens4
                addresses: [10.0.1.4/24]
                gateway4: 10.0.1.5
                nameservers:
                    addresses: [192.168.202.2, 192.168.200.2, 8.8.8.8]
Y nuevamente realizamos las comprobaciones necesarias:
    ubuntu@sancho:~$ ping 10.0.1.5
    PING 10.0.1.5 (10.0.1.5) 56(84) bytes of data.
    64 bytes from 10.0.1.5: icmp_seq=1 ttl=64 time=0.804 ms

    --- 10.0.1.5 ping statistics ---
    1 packets transmitted, 1 received, 0% packet loss, time 0ms
    rtt min/avg/max/mdev = 0.804/0.804/0.804/0.000 ms
    ubuntu@sancho:~$ ping 8.8.8.8
    PING 8.8.8.8 (8.8.8.8) 56(84) bytes of data.
    64 bytes from 8.8.8.8: icmp_seq=1 ttl=111 time=42.9 ms

    --- 8.8.8.8 ping statistics ---
    1 packets transmitted, 1 received, 0% packet loss, time 0ms
    rtt min/avg/max/mdev = 42.904/42.904/42.904/0.000 ms
    ubuntu@sancho:~$ ping www.google.es
    PING www.google.es (172.217.17.3) 56(84) bytes of data.
    64 bytes from mad07s09-in-f3.1e100.net (172.217.17.3): icmp_seq=1 ttl=112 time=52.3 ms

    --- www.google.es ping statistics ---
    1 packets transmitted, 1 received, 0% packet loss, time 0ms
    rtt min/avg/max/mdev = 52.290/52.290/52.290/0.000 ms
Ahora que nuestro escenario tiene conectividad entre si y fuera, vamos a habilitar ssh-agent, para solo tener que usar nuestra clave una vez, para conectarnos a Dulcinea y después poder conectarnos a las diferentes máquinas de nuestro escenario sin tener que usar la clave ni tener que pasarla a todas las máquinas.
    root@dulcinea:/home/debian/.ssh# ssh-add claves.pem
    Identity added: claves.pem (claves.pem)
    root@dulcinea:/home/debian/.ssh# ssh-add -l
    2048 SHA256:Ezez5qCsyIdVPMXSsBxuJSAkeh6sZdbkmSG/XzJv+c8 claves.pem (RSA)
Debemos asegurarnos que las siguientes lineas de los fichero “etc/ssh/ssh_config” y “etc/ssh/sshd_config” se encuentren de la siguiente manera
ssh_config
ForwardAgent yes
sshd_config
AllowAgentForwarding yes
Si queremos que se quede permanentemente debemos crear en “~/.ssh/” un archivo “config” el cual por seguridad le pondremos los permisos 600 y añadiremos la siguiente línea:
IdentityFile ~/.ssh/claves.pem
Comprobemos su funcionamiento:
Freston
    debian@dulcinea:~$ ssh debian@10.0.1.9
    Linux freston 4.19.0-11-cloud-amd64 #1 SMP Debian 4.19.146-1 (2020-09-17) x86_64

    The programs included with the Debian GNU/Linux system are free software;
    the exact distribution terms for each program are described in the
    individual files in /usr/share/doc/*/copyright.

    Debian GNU/Linux comes with ABSOLUTELY NO WARRANTY, to the extent
    permitted by applicable law.
    Last login: Wed Feb 17 07:32:40 2021 from 10.0.1.5
    debian@freston:~$
Quijote
    debian@dulcinea:~$ ssh centos@10.0.2.2
    Last login: Wed Feb 17 07:34:07 2021 from 10.0.2.11
    [centos@quijote ~]$
Sancho
    debian@dulcinea:~$ ssh ubuntu@10.0.1.4
    Welcome to Ubuntu 20.04.1 LTS (GNU/Linux 5.4.0-48-generic x86_64)

     * Documentation:  https://help.ubuntu.com
     * Management:     https://landscape.canonical.com
     * Support:        https://ubuntu.com/advantage

      System information as of Wed Feb 17 07:35:45 UTC 2021

      System load:  0.01              Processes:             101
      Usage of /:   21.2% of 9.52GB   Users logged in:       0
      Memory usage: 40%               IPv4 address for ens4: 10.0.1.4
      Swap usage:   0%

     * Introducing self-healing high availability clusters in MicroK8s.
       Simple, hardened, Kubernetes for production, from RaspberryPi to DC.

         https://microk8s.io/high-availability

    74 updates can be installed immediately.
    0 of these updates are security updates.
    To see these additional updates run: apt list --upgradable


    *** System restart required ***
    Last login: Wed Feb 17 07:33:48 2021 from 10.0.1.5
    ubuntu@sancho:~$
Ahora crearemos los usuarios profesor en todas las máquinas y los añadiremos a sudoers (este proceso es igual en todas las máquinas):
    root@dulcinea:~# useradd profesor -m -s /bin/bash

    root@dulcinea:~# echo "profesor ALL=(ALL) NOPASSWD:ALL" >> /etc/sudoers
Para añadir sus claves deberemos crearles una carpeta .ssh en su carpeta personal y un fichero authorized_keys donde añadiremos las claves necesarias:
    profesor@dulcinea:~$ mkdir .ssh
    profesor@dulcinea:~$ nano .ssh/authorized_keys
Por supuesto cambiamos los permisos por seguridad:
    profesor@dulcinea:~$ chmod 700 .ssh/
    profesor@dulcinea:~$ chmod 600 .ssh/authorized_keys
Configuramos los nombres de dominio de cada maquina
    debian@dulcinea:~$ hostname --fqdn
    dulcinea.gonzalonzareno.org

    debian@freston:~$ hostname --fqdn
    freston.gonzalonzareno.org

    [centos@quijote ~]$ sudo hostnamectl set-hostname quijote.gonzalonzareno.org
    [centos@quijote ~]$ sudo hostnamectl status
       Static hostname: quijote.gonzalonzareno.org
             Icon name: computer-vm
               Chassis: vm
            Machine ID: cab9605edaa5484da7c2f02b8fd10762
               Boot ID: 3ee2734a439e4e22a1e549e02e1bcc57
        Virtualization: kvm
      Operating System: CentOS Linux 8
           CPE OS Name: cpe:/o:centos:centos:8
                Kernel: Linux 4.18.0-240.10.1.el8_3.x86_64
          Architecture: x86-64

    ubuntu@sancho:~$ sudo hostnamectl set-hostname sancho.gonzalonzareno.org
    ubuntu@sancho:~$ sudo hostnamectl
       Static hostname: sancho.gonzalonzareno.org
             Icon name: computer-vm
               Chassis: vm
            Machine ID: 9138cf2982db44c5874f2d6fc46ab48a
               Boot ID: eda34c94d09f47d386baaa057ea4dc7b
        Virtualization: kvm
      Operating System: Ubuntu 20.04.2 LTS
                Kernel: Linux 5.4.0-48-generic
          Architecture: x86-64
Por último, para confirmar que nuestro servidor tiene sincronizado su reloj añadiremos estas líneas en el fichero /etc/ntp.conf
    server 0.es.pool.ntp.org
    server 0.europe.pool.ntp.org
    server 2.europe.pool.ntp.org
Y ejecutaremos el siguiente comando
    debian@dulcinea:~$ sudo ntpdate -u pool.ntp.org
    16 Mar 13:05:12 ntpdate[6695]: adjust time server 213.251.52.234 offset 0.021472 sec