VPN de acceso remoto con OpenVPN y certificados x509
- Tenemos dos equipos en vagrant a los que queremos configurarles una conexión VPN. empezemos con el servidor, este está conectado a una red
10.99.99.0/24a parte de la red que usamos para conectarnos a esta y una interna.
vagrant@servidor:~$ ip a
1: lo: <LOOPBACK,UP,LOWER_UP> mtu 65536 qdisc noqueue state UNKNOWN group default qlen 1000
    link/loopback 00:00:00:00:00:00 brd 00:00:00:00:00:00
    inet 127.0.0.1/8 scope host lo
       valid_lft forever preferred_lft forever
    inet6 ::1/128 scope host
       valid_lft forever preferred_lft forever
2: eth0: <BROADCAST,MULTICAST,UP,LOWER_UP> mtu 1500 qdisc pfifo_fast state UP group default qlen 1000
    link/ether 52:54:00:b1:e4:53 brd ff:ff:ff:ff:ff:ff
    altname enp0s5
    altname ens5
    inet 192.168.121.223/24 brd 192.168.121.255 scope global dynamic eth0
       valid_lft 3515sec preferred_lft 3515sec
    inet6 fe80::5054:ff:feb1:e453/64 scope link
       valid_lft forever preferred_lft forever
3: eth1: <BROADCAST,MULTICAST,UP,LOWER_UP> mtu 1500 qdisc pfifo_fast state UP group default qlen 1000
    link/ether 52:54:00:e3:f2:0c brd ff:ff:ff:ff:ff:ff
    altname enp0s6
    altname ens6
    inet 192.168.10.10/24 brd 192.168.10.255 scope global eth1
       valid_lft forever preferred_lft forever
    inet6 fe80::5054:ff:fee3:f20c/64 scope link
       valid_lft forever preferred_lft forever
4: eth2: <BROADCAST,MULTICAST,UP,LOWER_UP> mtu 1500 qdisc pfifo_fast state UP group default qlen 1000
    link/ether 52:54:00:f9:6f:5f brd ff:ff:ff:ff:ff:ff
    altname enp0s7
    altname ens7
    inet 192.168.11.10/24 brd 192.168.11.255 scope global eth2
       valid_lft forever preferred_lft forever
    inet6 fe80::5054:ff:fef9:6f5f/64 scope link
       valid_lft forever preferred_lft forever
Instalación de openvpn
- La instalación es bastante sencilla pues se encuentra en los repositorios de debian.
vagrant@servidor:~$ sudo apt install openvpn
- También debemos habilitar el forwarding
root@servidor:~# echo 1 > /proc/sys/net/ipv4/ip_forward
- para la autentificación de los extremos vamos a usar certificados digitales con openssl y el parametro Diffie-Helman, para realizar esto haremos uso de la herramienta easy-rsa.
vagrant@servidor:~$ sudo apt install easy-rsa
Creación de claves y certificados
- Si necesitaramos que esta VPN perdurara en el tiempo deberíamos copiar el contenido de la carpeta
/usr/share/easy-rsaen/etc/openvpnesto debido a que podría perderse la configuración que hagamos en actualizaciones futuras del paquete Openvpn.
root@servidor:~# sudo cp -r /usr/share/easy-rsa /etc/openvpn
- Inicializamos easy-rsa
root@servidor:/etc/openvpn/easy-rsa# ./easyrsa init-pki

init-pki complete; you may now create a CA or requests.
Your newly created PKI dir is: /etc/openvpn/easy-rsa/pki
Para OpenVPN necesitamos crear:
- Una clave privada y un certificado x509 para la autoridad certificante que firma (CA)
- Una clave privada y un certificado x509 firmado para el servidor.
- Una clave privada y un certificado x509 firmado para cada cliente.
- Un grupo Diffie-Hellman para el servidor.
Claves
- Iniciaremos nuestro directorio pki.
root@servidor:/etc/openvpn/easy-rsa# ./easyrsa init-pki

init-pki complete; you may now create a CA or requests.
Your newly created PKI dir is: /home/vagrant/claves/pki
- Crearemos nuestro CA para firmar las claves del servidor y los clientes.
root@servidor:/etc/openvpn/easy-rsa# ./easyrsa build-ca
Using SSL: openssl OpenSSL 1.1.1k  25 Mar 2021

Enter New CA Key Passphrase:
Re-Enter New CA Key Passphrase:
Generating RSA private key, 2048 bit long modulus (2 primes)
...+++++
.................................+++++
e is 65537 (0x010001)
You are about to be asked to enter information that will be incorporated
into your certificate request.
What you are about to enter is what is called a Distinguished Name or a DN.
There are quite a few fields but you can leave some blank
For some fields there will be a default value,
If you enter '.', the field will be left blank.
-----
Common Name (eg: your user, host, or server name) [Easy-RSA CA]:servidor CA

CA creation complete and you may now import and sign cert requests.
Your new CA certificate file for publishing is at:
/etc/openvpn/easy-rsa/pki/ca.crt
- Nuestro siguiente paso será generar los parametros Diffie-Hellman, un algoritmo de intercambio de claves necesario para nuestro servidor Openvpn.
root@servidor:/etc/openvpn/easy-rsa# ./easyrsa gen-dh
Using SSL: openssl OpenSSL 1.1.1k  25 Mar 2021
Generating DH parameters, 2048 bit long safe prime, generator 2
This is going to take a long time
..................................................................+.............................................................+........................+........

DH parameters of size 2048 created at /etc/openvpn/easy-rsa/pki/dh.pem
- Esto ha generado un fichero
dh.pemdentro del directorio pki, ahora crearemos clave privada para el servidor, voy a usar un parametronopasspara no tener que usar frase de paso.
root@servidor:/etc/openvpn/easy-rsa# ./easyrsa build-server-full server nopass
Using SSL: openssl OpenSSL 1.1.1k  25 Mar 2021
Generating a RSA private key
......+++++
.............................................................................................................................................+++++
writing new private key to '/etc/openvpn/easy-rsa/pki/easy-rsa-10420.dUU4xM/tmp.kp2nTj'
-----
Using configuration from /etc/openvpn/easy-rsa/pki/easy-rsa-10420.dUU4xM/tmp.1NY3KO
Enter pass phrase for /etc/openvpn/easy-rsa/pki/private/ca.key:
Check that the request matches the signature
Signature ok
The Subject's Distinguished Name is as follows
commonName            :ASN.1 12:'server'
Certificate is to be certified until Jun 13 17:22:43 2024 GMT (825 days)

Write out database with 1 new entries
Data Base Updated
- También debemos crear el certificado y clave privada para nuestro cliente.
root@servidor:/etc/openvpn/easy-rsa# ./easyrsa build-client-full cliente1 nopass
Using SSL: openssl OpenSSL 1.1.1k  25 Mar 2021
Generating a RSA private key
..........+++++
.......................+++++
writing new private key to '/etc/openvpn/easy-rsa/pki/easy-rsa-10694.qxK5kV/tmp.DEHba0'
-----
Using configuration from /etc/openvpn/easy-rsa/pki/easy-rsa-10694.qxK5kV/tmp.9IaoBQ
Enter pass phrase for /etc/openvpn/easy-rsa/pki/private/ca.key:
Check that the request matches the signature
Signature ok
The Subject's Distinguished Name is as follows
commonName            :ASN.1 12:'cliente1'
Certificate is to be certified until Jun 13 17:43:10 2024 GMT (825 days)

Write out database with 1 new entries
Data Base Updated
- Ahora usaremos el fichero de ejemplo para crear el túnel, para ello copiaremos el fichero.
vagrant@servidor:~$ sudo cp /usr/share/doc/openvpn/examples/sample-config-files/server.conf /etc/openvpn/server/servidor.conf
- Vamos a realizar la configuración
port 1194

# TCP or UDP server?
proto udp
dev tun

ca /etc/openvpn/easy-rsa/pki/ca.crt
cert /etc/openvpn/easy-rsa/pki/issued/server.crt
key /etc/openvpn/easy-rsa/pki/private/server.key
dh /etc/openvpn/easy-rsa/pki/dh.pem

topology subnet

server 10.99.99.0 255.255.255.0

ifconfig-pool-persist /var/log/openvpn/ipp.txt

push "route 192.168.11.0 255.255.255.0"

keepalive 10 120
cipher AES-256-CBC
persist-key
persist-tun
status /var/log/openvpn/openvpn-status.log
verb 3
explicit-exit-notify 1
- Vamos a habilitar este servicio.
vagrant@servidor:~$ sudo systemctl enable --now openvpn-server@servidor
Created symlink /etc/systemd/system/multi-user.target.wants/openvpn-server@servidor.service → /lib/systemd/system/openvpn-server@.service.
Cliente 1
- Hemos terminado por ahora con el servidor, pasemos al cliente 1, debemos pasar todos los certificados y claves necesarias a este cliente.
vagrant@cliente1:~$ ls
ca.crt  cliente1.crt  cliente1.key
- Las movemos al directorio correcto de openvpn.
vagrant@cliente1:~$ sudo mv c* /etc/openvpn/client/
vagrant@cliente1:~$ ls /etc/openvpn/client/
ca.crt  cliente1.crt  cliente1.key
- El propietario de estos fichero debe ser root
vagrant@cliente1:~$ sudo chown root: /etc/openvpn/client/*
- Tal como hicimos con la configuración del servidor vamos a hacer lo propio con el cliente.
vagrant@cliente1:~$ sudo cp /usr/share/doc/openvpn/examples/sample-config-files/client.conf /etc/openvpn/client/cliente.conf
- Realizamos la configuración
client
dev tun
proto udp

remote 192.168.10.10 1194
resolv-retry infinite
nobind
persist-key
persist-tun

ca /etc/openvpn/client/ca.crt
cert /etc/openvpn/client/cliente1.crt
key /etc/openvpn/client/cliente1.key

remote-cert-tls server
cipher AES-256-CBC
verb 3
- Ahora habilitemos este servicio.
vagrant@cliente1:~$ sudo systemctl enable --now openvpn-client@cliente
Created symlink /etc/systemd/system/multi-user.target.wants/openvpn-client@cliente.service → /lib/systemd/system/openvpn-client@.service.
Pruebas de funcionamiento
- Vamos a comprobar que se han creado dos interfaces, una en el servidor y otra en el ciente llamadas tun0
vagrant@cliente1:~$ ip a
...
...
...
4: tun0: <POINTOPOINT,MULTICAST,NOARP,UP,LOWER_UP> mtu 1500 qdisc pfifo_fast state UNKNOWN group default qlen 500
    link/none
    inet 10.99.99.2/24 scope global tun0
       valid_lft forever preferred_lft forever
    inet6 fe80::4ece:ea8d:e88a:e42/64 scope link stable-privacy
       valid_lft forever preferred_lft forever

vagrant@servidor:~$ ip a
...
...
...
5: tun0: <POINTOPOINT,MULTICAST,NOARP,UP,LOWER_UP> mtu 1500 qdisc pfifo_fast state UNKNOWN group default qlen 500
    link/none
    inet 10.99.99.1/24 scope global tun0
       valid_lft forever preferred_lft forever
    inet6 fe80::1d69:af12:a412:7c54/64 scope link stable-privacy
       valid_lft forever preferred_lft foreverha
- Se puede hacer ping a la otra maquina desde esta interfaz.
vagrant@servidor:~$ ping 10.99.99.1
PING 10.99.99.1 (10.99.99.1) 56(84) bytes of data.
64 bytes from 10.99.99.1: icmp_seq=1 ttl=64 time=0.063 ms
^C
--- 10.99.99.1 ping statistics ---
1 packets transmitted, 1 received, 0% packet loss, time 0ms
rtt min/avg/max/mdev = 0.063/0.063/0.063/0.000 ms
VPN sitio a sitio con OpenVPN y certificados x509
- Para este apartado tendremos dos servidores, cada uno en una red distinta y cada uno tendrá un cliente, el objetivo es crear un tunel que conecta a los dos clientes de las dos distintas redes.
Servidor 1
Certificados y claves.
- Lo primero será crear un fichero
varsen/usr/share/easy-rsadonde copiaremos el contenido de vars.example alojado en la misma carpeta y añadiremos lo siguiente. Esto hará que al crear nuestra unidad certificadora ponga los siguientes valores por defecto.
set_var EASYRSA_REQ_COUNTRY     "ES"
set_var EASYRSA_REQ_PROVINCE    "Sevilla"
set_var EASYRSA_REQ_CITY        "Dos Hermanas"
set_var EASYRSA_REQ_ORG         "alegv gn"
set_var EASYRSA_REQ_EMAIL       "tojandro@gmail.com"
set_var EASYRSA_REQ_OU          "VPN"
- Inicializamos un directorio pki.
vagrant@servidor1:/usr/share/easy-rsa$ sudo ./easyrsa init-pki

Note: using Easy-RSA configuration from: /usr/share/easy-rsa/vars

init-pki complete; you may now create a CA or requests.
Your newly created PKI dir is: /usr/share/easy-rsa/pki
- Y antes de crear la unidad certificadora debemos crear una clave deffie-helman.
vagrant@servidor1:/usr/share/easy-rsa$ sudo ./easyrsa gen-dh

Note: using Easy-RSA configuration from: /usr/share/easy-rsa/vars
Using SSL: openssl OpenSSL 1.1.1k  25 Mar 2021
Generating DH parameters, 2048 bit long safe prime, generator 2
This is going to take a long time
...................................................................................+..............................................................................

DH parameters of size 2048 created at /usr/share/easy-rsa/pki/dh.pem
- Ahora si, podemos crear el certificado
vagrant@servidor1:/usr/share/easy-rsa$ sudo ./easyrsa build-ca

Note: using Easy-RSA configuration from: /usr/share/easy-rsa/vars
Using SSL: openssl OpenSSL 1.1.1k  25 Mar 2021

Enter New CA Key Passphrase:
Re-Enter New CA Key Passphrase:
Generating RSA private key, 2048 bit long modulus (2 primes)
........................................+++++
.............................................+++++
e is 65537 (0x010001)
You are about to be asked to enter information that will be incorporated
into your certificate request.
What you are about to enter is what is called a Distinguished Name or a DN.
There are quite a few fields but you can leave some blank
For some fields there will be a default value,
If you enter '.', the field will be left blank.
-----
Common Name (eg: your user, host, or server name) [Easy-RSA CA]:Alejandro Gutierrez

CA creation complete and you may now import and sign cert requests.
Your new CA certificate file for publishing is at:
/usr/share/easy-rsa/pki/ca.crt
- Ahora debemos crear el certificado que usará nuestro servidor 1.
vagrant@servidor1:/usr/share/easy-rsa$ sudo ./easyrsa gen-req servidor1

Note: using Easy-RSA configuration from: /usr/share/easy-rsa/vars
Using SSL: openssl OpenSSL 1.1.1k  25 Mar 2021
Generating a RSA private key
......................................+++++
....................................................................+++++
writing new private key to '/usr/share/easy-rsa/pki/easy-rsa-18818.A1xROb/tmp.ah7B0R'
Enter PEM pass phrase:
Verifying - Enter PEM pass phrase:
-----
You are about to be asked to enter information that will be incorporated
into your certificate request.
What you are about to enter is what is called a Distinguished Name or a DN.
There are quite a few fields but you can leave some blank
For some fields there will be a default value,
If you enter '.', the field will be left blank.
-----
Common Name (eg: your user, host, or server name) [servidor1]:Alejandro Gutierrez

Keypair and certificate request completed. Your files are:
req: /usr/share/easy-rsa/pki/reqs/servidor1.req
key: /usr/share/easy-rsa/pki/private/servidor1.key
- Y lo firmamos con la unidad certificadora que creamos al principio.
vagrant@servidor1:/usr/share/easy-rsa$ sudo ./easyrsa sign-req server servidor1

Note: using Easy-RSA configuration from: /usr/share/easy-rsa/vars
Using SSL: openssl OpenSSL 1.1.1k  25 Mar 2021


You are about to sign the following certificate.
Please check over the details shown below for accuracy. Note that this request
has not been cryptographically verified. Please be sure it came from a trusted
source or that you have verified the request checksum with the sender.

Request subject, to be signed as a server certificate for 825 days:

subject=
    commonName                = Alejandro Gutierrez


Type the word 'yes' to continue, or any other input to abort.
  Confirm request details: yes
Using configuration from /usr/share/easy-rsa/pki/easy-rsa-18883.1sNsw0/tmp.I6fNto
Enter pass phrase for /usr/share/easy-rsa/pki/private/ca.key:
Check that the request matches the signature
Signature ok
The Subject's Distinguished Name is as follows
commonName            :ASN.1 12:'Alejandro Gutierrez'
Certificate is to be certified until Jun 14 15:29:36 2024 GMT (825 days)

Write out database with 1 new entries
Data Base Updated

Certificate created at: /usr/share/easy-rsa/pki/issued/servidor1.crt
- Ahora en el mismo servidor 1 vamos a crear y firmar el certificado que usara el servidor 2.
vagrant@servidor1:/usr/share/easy-rsa$ sudo ./easyrsa gen-req servidor2

Note: using Easy-RSA configuration from: /usr/share/easy-rsa/vars
Using SSL: openssl OpenSSL 1.1.1k  25 Mar 2021
Generating a RSA private key
............+++++
.................................................................................................................................................+++++
writing new private key to '/usr/share/easy-rsa/pki/easy-rsa-18981.BFl10N/tmp.JaluUr'
Enter PEM pass phrase:
Verifying - Enter PEM pass phrase:
-----
You are about to be asked to enter information that will be incorporated
into your certificate request.
What you are about to enter is what is called a Distinguished Name or a DN.
There are quite a few fields but you can leave some blank
For some fields there will be a default value,
If you enter '.', the field will be left blank.
-----
Common Name (eg: your user, host, or server name) [servidor2]:servidor2

Keypair and certificate request completed. Your files are:
req: /usr/share/easy-rsa/pki/reqs/servidor2.req
key: /usr/share/easy-rsa/pki/private/servidor2.key
vagrant@servidor1:/usr/share/easy-rsa$ sudo ./easyrsa sign-req client servidor2

Note: using Easy-RSA configuration from: /usr/share/easy-rsa/vars
Using SSL: openssl OpenSSL 1.1.1k  25 Mar 2021


You are about to sign the following certificate.
Please check over the details shown below for accuracy. Note that this request
has not been cryptographically verified. Please be sure it came from a trusted
source or that you have verified the request checksum with the sender.

Request subject, to be signed as a client certificate for 825 days:

subject=
    commonName                = servidor2


Type the word 'yes' to continue, or any other input to abort.
  Confirm request details: yes
Using configuration from /usr/share/easy-rsa/pki/easy-rsa-19004.YLjnYV/tmp.q13nxi
Enter pass phrase for /usr/share/easy-rsa/pki/private/ca.key:
Check that the request matches the signature
Signature ok
The Subject's Distinguished Name is as follows
commonName            :ASN.1 12:'servidor2'
Certificate is to be certified until Jun 14 15:32:40 2024 GMT (825 days)

Write out database with 1 new entries
Data Base Updated

Certificate created at: /usr/share/easy-rsa/pki/issued/servidor2.crt
- Necesitamos copiar los siguientes ficheros en el directorio
/etc/openvpn/server/
root@servidor1:/usr/share/easy-rsa/pki# cp ca.crt /etc/openvpn/server/
root@servidor1:/usr/share/easy-rsa/pki# cp dh.pem /etc/openvpn/server/
root@servidor1:/usr/share/easy-rsa/pki# cp issued/servidor1.crt /etc/openvpn/server/
root@servidor1:/usr/share/easy-rsa/pki# cp private/servidor1.key /etc/openvpn/server/
Configuración del tunel
- Vamos a configurar el servicio, para ello crearemos un fichero en
/etc/openvpn/server/al que llamaré servidor1.conf con la siguiente información
port 1194

dev tun

ifconfig 10.99.99.1 10.99.99.2
route 172.100.0.0 255.255.255.0

tls-server

ca ca.crt
cert servidor1.crt
key servidor1.key
dh dh.pem

comp-lzo
keepalive 10 120
log /var/log/openvpn/server.log
verb 3

askpass passwd.txt
-
Como vemos en la última línea hacemos referencia a un fichero llamado passwd.txt, es un fichero que vamos a crear en
/etc/openvpn/server/con ese nombre donde pondremos la contraseña de la unidad certificadora. -
Necesitaremos tener el bit de forwarding acivo.
root@servidor1:/etc/openvpn/server# echo 1 > /proc/sys/net/ipv4/ip_forward
- Ahora iniciamos el servicio.
root@servidor1:/etc/openvpn/server# systemctl start openvpn-server@servidor1

root@servidor1:/etc/openvpn/server# systemctl status openvpn-server@servidor1
● openvpn-server@servidor1.service - OpenVPN service for servidor1
     Loaded: loaded (/lib/systemd/system/openvpn-server@.service; disabled; vendor preset: enabled)
     Active: active (running) since Sat 2022-03-12 16:55:35 UTC; 1min 46s ago
       Docs: man:openvpn(8)
             https://community.openvpn.net/openvpn/wiki/Openvpn24ManPage
             https://community.openvpn.net/openvpn/wiki/HOWTO
   Main PID: 12841 (openvpn)
     Status: "Pre-connection initialization successful"
      Tasks: 1 (limit: 1132)
     Memory: 1.0M
        CPU: 52ms
     CGroup: /system.slice/system-openvpn\x2dserver.slice/openvpn-server@servidor1.service
             └─12841 /usr/sbin/openvpn --status /run/openvpn-server/status-servidor1.log --status-version 2 --suppress-timestamps --config servidor1.conf

Mar 12 16:55:35 servidor1 systemd[1]: Starting OpenVPN service for servidor1...
Mar 12 16:55:35 servidor1 systemd[1]: Started OpenVPN service for servidor1.
Cliente 1
- Lo unico que debemos hacer aquí es quitar el enrutamiento que tiene por defecto.
vagrant@cliente1:~$ sudo ip r del default
vagrant@cliente1:~$ sudo ip r add default via 172.50.0.10
Servidor 2
- Debemos pasar las siguentes claves y certificados al servidor 2 que creamos en el servidor 1.
vagrant@servidor2:~$ ls
ca.crt  servidor2.crt  servidor2.key
- Después de mover estos ficheros a la carpeta
/etc/openvpn/client/vamos a realizar la configuración de este servidor creando un fichero que en mi caso llamaré servidor2.conf dentro de/etc/openvpn/client/.
dev tun

remote 192.168.121.151
ifconfig 10.99.99.2 10.99.99.1
route 172.50.0.0 255.255.255.0

tls-client

ca ca.crt
cert servidor2.crt
key servidor2.key

comp-lzo
keepalive 10 60
verb 3

askpass passwd2.txt
- Iniciamos el servicio.
vagrant@servidor2:~$ sudo systemctl start openvpn-client@servidor2

vagrant@servidor2:~$ sudo systemctl status openvpn-client@servidor2
● openvpn-client@servidor2.service - OpenVPN tunnel for servidor2
     Loaded: loaded (/lib/systemd/system/openvpn-client@.service; disabled; vendor preset: enabled)
     Active: active (running) since Sat 2022-03-12 17:09:52 UTC; 44s ago
       Docs: man:openvpn(8)
             https://community.openvpn.net/openvpn/wiki/Openvpn24ManPage
             https://community.openvpn.net/openvpn/wiki/HOWTO
   Main PID: 18882 (openvpn)
     Status: "Initialization Sequence Completed"
      Tasks: 1 (limit: 1132)
     Memory: 1016.0K
        CPU: 1.055s
     CGroup: /system.slice/system-openvpn\x2dclient.slice/openvpn-client@servidor2.service
             └─18882 /usr/sbin/openvpn --suppress-timestamps --nobind --config servidor2.conf

Mar 12 17:09:53 servidor2 openvpn[18882]: WARNING: INSECURE cipher (BF-CBC) with block size less than 128 bit (64 bit).  This allows attacks like SWEET32.  Mitigate by using a --cipher with a larger block size >
Mar 12 17:09:53 servidor2 openvpn[18882]: Incoming Data Channel: Using 160 bit message hash 'SHA1' for HMAC authentication
Mar 12 17:09:53 servidor2 openvpn[18882]: WARNING: cipher with small block size in use, reducing reneg-bytes to 64MB to mitigate SWEET32 attacks.
Mar 12 17:09:53 servidor2 openvpn[18882]: Control Channel: TLSv1.3, cipher TLSv1.3 TLS_AES_256_GCM_SHA384, 2048 bit RSA
Mar 12 17:09:53 servidor2 openvpn[18882]: [Alejandro Gutierrez] Peer Connection Initiated with [AF_INET]192.168.121.151:1194
Mar 12 17:09:54 servidor2 openvpn[18882]: Initialization Sequence Completed
Mar 12 17:10:03 servidor2 openvpn[18882]: Bad LZO decompression header byte: 42
Mar 12 17:10:13 servidor2 openvpn[18882]: Bad LZO decompression header byte: 42
Mar 12 17:10:23 servidor2 openvpn[18882]: Bad LZO decompression header byte: 42
Mar 12 17:10:33 servidor2 openvpn[18882]: Bad LZO decompression header byte: 42
- También debemos activar aquí el bit de forwading.
root@servidor2:~# echo 1 > /proc/sys/net/ipv4/ip_forward
Cliente 2
- Realizamos el mismo paso que con el anterior cliente, cambiar la ruta de direccionamiento.
vagrant@cliente2:~$ sudo ip r del default
vagrant@cliente2:~$ sudo ip r add default via 172.100.0.10
Comprobaciones
- Rutas del servidor 1.
vagrant@servidor1:~$ ip r
default via 192.168.121.1 dev eth0
10.99.99.2 dev tun0 proto kernel scope link src 10.99.99.1
172.50.0.0/24 dev eth1 proto kernel scope link src 172.50.0.10
172.100.0.0/24 via 10.99.99.2 dev tun0
192.168.121.0/24 dev eth0 proto kernel scope link src 192.168.121.151
- Rutas del servidor 2.
vagrant@servidor2:~$ ip r
default via 192.168.121.1 dev eth0
10.99.99.1 dev tun0 proto kernel scope link src 10.99.99.2
172.50.0.0/24 via 10.99.99.1 dev tun0
172.100.0.0/24 dev eth1 proto kernel scope link src 172.100.0.10
192.168.121.0/24 dev eth0 proto kernel scope link src 192.168.121.56
- Ping desde el cliente 1 al cliente 2.
vagrant@cliente1:~$ ping 172.100.0.15
PING 172.100.0.15 (172.100.0.15) 56(84) bytes of data.
64 bytes from 172.100.0.15: icmp_seq=1 ttl=64 time=2.108 ms
^C
--- 172.100.0.15 ping statistics ---
1 packets transmitted, 1 received, 0% packet loss, time 0ms
rtt min/avg/max/mdev = 2.108/2.108/2.108/0.033 ms
- Ping desde el cliente 2 al cliente 1.
vagrant@cliente2:~$ ping 172.50.0.15
PING 172.50.0.15 (172.50.0.15) 56(84) bytes of data.
64 bytes from 172.50.0.15: icmp_seq=1 ttl=64 time=2.476 ms
^C
--- 172.50.0.15 ping statistics ---
1 packets transmitted, 1 received, 0% packet loss, time 0ms
rtt min/avg/max/mdev = 2.476/2.476/2.476/0.021 ms
VPN de acceso remoto con WireGuard.
- Esta vez vamos a montar una vpn con wireward y tendremos un servidor con varios clientes, uno debian, otro windows y un último android
Servidor
- Instalamos wireguard.
vagrant@servervpn:~$ sudo apt install wireguard
- Creamos un par de claves usando un comando de wireguard, que tendremos que copiar y pegar en el fichero de configuración que crearemos después de este paso.
vagrant@servervpn:~$ sudo wg genkey | tee privada.key | wg pubkey > publica.key
- Crearemos y configuraremos un fichero que se ubicará en
/etc/wireguard/donde crearemos la interfaz.
[Interface]
Address = 10.99.99.1/24
ListenPort = 51820
PrivateKey = yDf5Us9NjerWSaELL/ftiUBawBYit8oDUqgUIIpGMU0=

# IP forwarding
PreUp = sysctl -w net.ipv4.ip_forward=1

[Peer]
PublicKey = Tg6VLcM/ZFPdX99NIPewNTKLxsHdXCmL2y8YzwxU+HU=
AllowedIPs = 10.99.99.2/32
- Y podemos iniciarla.
vagrant@servervpn:~$ sudo wg-quick up /etc/wireguard/wg0.conf
[#] sysctl -w net.ipv4.ip_forward=1
net.ipv4.ip_forward = 1
[#] ip link add wg0 type wireguard
[#] wg setconf wg0 /dev/fd/63
[#] ip -4 address add 10.99.99.1/24 dev wg0
[#] ip link set mtu 1420 up dev wg0
- Se ha creado la nueva interfaz y la ruta.
vagrant@servervpn:~$ ip a
5: wg0: <POINTOPOINT,NOARP,UP,LOWER_UP> mtu 1420 qdisc noqueue state UNKNOWN group default qlen 1000
    link/none
    inet 10.99.99.1/24 scope global wg0
       valid_lft forever preferred_lft forever

vagrant@servervpn:~$ ip r
default via 192.168.121.1 dev eth0
10.99.99.0/24 dev wg0 proto kernel scope link src 10.99.99.1
Cliente debian externo.
- Volvemos a instalar wireguard en este cliente y creamos las claves.
vagrant@cliente1:~$ wg genkey | sudo tee /etc/wireguard/cliente1_privada.key | wg pubkey | sudo tee /etc/wireguard/cliente1_publica.key
- Creamos el fichero de configuración para crear la interfaz esta vez apuntando hacia la red interna que conecta este cliente al servidor.
[Interface]
Address = 10.99.99.2/24
PrivateKey = 8EmkDCVWG8wzkZC4CvfA4Rf7SOPB2fg4LT3dhkqaj3Y=

[Peer]
PublicKey = p+betf59P45dPQG98xrAghMXqyObidHMru/eXkBx1Tk=
AllowedIPs = 0.0.0.0/0
Endpoint = 192.100.50.10:51820
PersistentKeepalive = 25
- Levantamos esta interfaz.
vagrant@cliente1:~$ sudo wg-quick up /etc/wireguard/wg-cliente0.conf
[#] ip link add wg-cliente0 type wireguard
[#] wg setconf wg-cliente0 /dev/fd/63
[#] ip -4 address add 10.99.99.2/24 dev wg-cliente0
[#] ip link set mtu 1420 up dev wg-cliente0
[#] wg set wg-cliente0 fwmark 51820
[#] ip -4 route add 0.0.0.0/0 dev wg-cliente0 table 51820
[#] ip -4 rule add not fwmark 51820 table 51820
[#] ip -4 rule add table main suppress_prefixlength 0
[#] sysctl -q net.ipv4.conf.all.src_valid_mark=1
[#] nft -f /dev/fd/63
- Se ha creado la interfaz y el enrutamiento.
vagrant@cliente1:~$ ip a
4: wg-cliente0: <POINTOPOINT,NOARP,UP,LOWER_UP> mtu 1420 qdisc noqueue state UNKNOWN group default qlen 1000
    link/none
    inet 10.99.99.2/24 scope global wg-cliente0
       valid_lft forever preferred_lft forever

vagrant@cliente1:~$ ip r
default via 192.168.121.1 dev eth0
10.99.99.0/24 dev wg-cliente0 proto kernel scope link src 10.99.99.2
Cliente interno.
- Aquí solo debemos cambiar la ruta por defecto.
vagrant@cliente2:~$ sudo ip route del default
vagrant@cliente2:~$ sudo ip route add default via 192.168.0.15
Pruebas clientes debian.
vagrant@cliente1:~$ ping 10.99.99.1
PING 10.99.99.1 (10.99.99.1) 56(84) bytes of data.
64 bytes from 10.99.99.1: icmp_seq=1 ttl=64 time=1.39 ms
64 bytes from 10.99.99.1: icmp_seq=2 ttl=64 time=0.676 ms
64 bytes from 10.99.99.1: icmp_seq=3 ttl=64 time=0.673 ms
vagrant@clientevpn:~$ ping 192.168.0.15
PING 192.168.0.15 (192.168.0.15) 56(84) bytes of data.
64 bytes from 192.168.0.15: icmp_seq=1 ttl=63 time=1.56 ms
64 bytes from 192.168.0.15: icmp_seq=2 ttl=63 time=0.360 ms
Cliente windows.
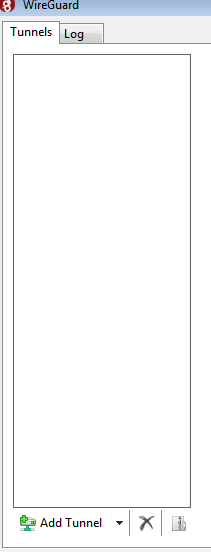
- Descargamos e instalamos el programa de wireguard para windows.

- Añadimos un túnel.
- Configuramos este tunel tal como hicimos con el cliente.
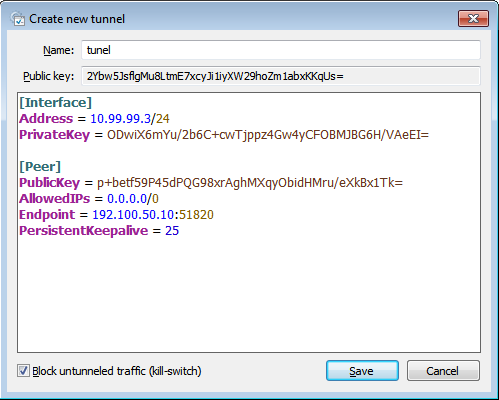
- Debemos añadir un nuevo peer en el fichero de configuración del servidor.
[Interface]
Address = 10.99.99.1/24
ListenPort = 51820
PrivateKey = yDf5Us9NjerWSaELL/ftiUBawBYit8oDUqgUIIpGMU0=

# IP forwarding
PreUp = sysctl -w net.ipv4.ip_forward=1

[Peer]
PublicKey = Tg6VLcM/ZFPdX99NIPewNTKLxsHdXCmL2y8YzwxU+HU=
AllowedIPs = 10.99.99.2/32

[Peer]
PublicKey = 2Ybw5JsflgMu8LtmE7xcyJi1iyXW29hoZm1abxKKqUS=
AllowedIPs = 10.99.99.3/32
- Activamos el tunel
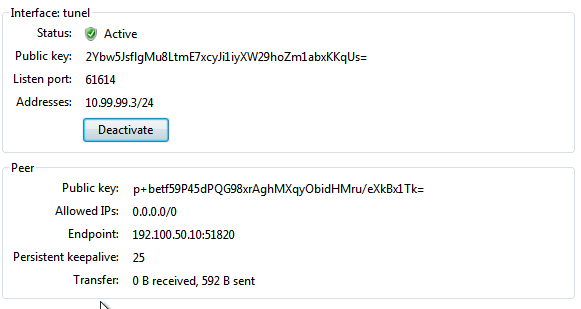
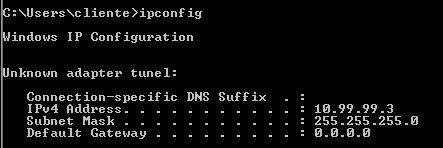
- Comprobamos que se ha creado la interfaz.
Cliente Android
- Descargamos la aplicación de wireguard en playstore.

- Ahora tenemos varias opciones de configuración vamos a usar la que parece más sencilla, mediante el codigo qr.

- Para hacerlo primero creamos un par de claves en el servidor para nuestro cliente.
vagrant@servervpn:~$ sudo wg genkey | tee privado-android.key | wg pubkey > publica-android.key
- Ahora creamos un fichero de configuración tal que así.
[Interface]
Address = 10.99.99.4
PrivateKey = 2K74Pj7F1Si95c1i+hTjaS3W//NsAksvEW0+AZ5X+VU=
ListenPort = 51820

[Peer]
Publickey = Tg6VLcM/ZFPdX99NIPewNTKLxsHdXCmL2y8YzwxU+HU=
AllowedIPs = 0.0.0.0/0
Endpoint = 192.168.1.118:51820
- Ahora instalaremos un paquete que nos generará el codigo qr.
vagrant@servervpn:~$ sudo apt install qrencode
- Generamos el código.
vagrant@servervpn:~$ qrencode -t ansiutf8 < cliente_android.conf
█████████████████████████████████████████████████████████████
█████████████████████████████████████████████████████████████
████ ▄▄▄▄▄ █▀ █▀▀█▄▄ ▄▄ ▀▀▀ ▀█ █▄▀▀▀▄▄▀█  █▄ ▀ ▀██ ▄▄▄▄▄ ████
████ █   █ █▄   ▀▀▀▀ ▀▄  ▀██▄    ▀ █▀▄▄   ██▄▄▀▄▀█ █   █ ████
████ █▄▄▄█ █  ▀█  ▀▀▄█ ▀███▄ ▄▄▄  ▀▄▀█▄▄█▄█▄█▄ ███ █▄▄▄█ ████
████▄▄▄▄▄▄▄█ █ █▄█▄▀ ▀▄▀▄▀▄▀ █▄█ █ █ ▀ █▄█ ▀▄█▄▀▄█▄▄▄▄▄▄▄████
████  █ ▀█▄ ██▀ ▄▀█▀█▀█▀▄ ▄█ ▄  ▄▀ █▄▄▄▀█ ▀██▀▄▄██▄ ▄█▄ ▀████
████▄█▄█▀▀▄▀▀▄▀███ ▀█▄ ▀▀▄█ ▄▀ █▀▀█▀ ██ █▄ ▀ ▀▄▄██▄▄▄ ▀ █████
████ █▄ █▄▄ ▀▄   ▀▀▀ ▄▀ ▄ ▀█▄█▄█▄▄█▄▀ ██▀▀  ▀ ▄█▀▄ ▀ ▀█▄ ████
████▀▀▄▄▀▄▄ ████▄   █ ██▄▄ ▀▄ ▄█▄▀█ █▀█▀ ██ ▄▄▄▄██▄  ▄█▄ ████
████ █ ▄▀█▄▄    █▀▀▀▀▀▀█ ▀█▀▄▄  ▄ ▄▀▀ ▀▀▄█▄▄▄ ▄█ ██ ▄█▀▄▀████
████ ▄▀▄▄▀▄ ███▄  ▄█ ▄  ▄█▀▀▀▄ ▀▄▄▄ ██▀▀▀ ▄█▄█▄█▄▄▀█▄▀▀ ▄████
█████▄█▄▄▀▄██▄██▄▀█▀█  ██▄█ ▄▀▄█ ▄█▀█▄█▄   ▄ ▄█▄ ███▀▀█ █████
████▀▄ ▄▀▄▄▀▀█▀▄▀▄  ▄  █▀ ▀▄▄▄█▀▄▄▄▀   █▄   █▀▄ ▀ ▄█▄▄▀██████
████▀█▄▀ ▄▄▄ ██▀▄▀▄ █  ▀█▄█▀ ▄▄▄   ▀██▄ █▄ ▄ ██▀ ▄▄▄ ▀█ ▄████
████▄██▀ █▄█ ▀▄   ▀▀▄█ ▀  ▀▄ █▄█ ▄█ ▀▄▄ ▄▄█████▀ █▄█ ▀ ▄▄████
█████▄▀▀  ▄▄ ▄▀█▀█ ▀▀▄▄▀▀ ██▄ ▄▄ ▀█ ▀  ▄█▀▀ ▀▄ ▀▄   ▄█ ▀ ████
█████▀ ▀▀▀▄ █▄▀▄▀▄▀ ▀█  █ ▄██ █▄▄▀ ▀▄█▄ ▄ █ ▄▀ ▄▀ ▄▀▀▀█▀▀████
████  ██▄ ▄▀ ▀ ▀▀ ▄▄▄▀▀▀███ ▀ ▄ █▀  ▄ ▄ █ █▀▄▀▀ ▀█  ▄█▄▀▄████
████  ▄█▄ ▄▄▄█▀▀▄▀▄ ▄█  ▀▄▀▀▄▄▄  ▀▄█ ▄█ ▄▄▀▀▄▄█▄▀ ▀██ ▀▄▀████
████▀▄ ▄▄█▄ ▄▀▀ ▄ ▄  ▀▄▄ ▄▄▄▀█▄█▄▀  ▀▄  ▀█ █  ▀█▄▄ ▀▄▄██▀████
████ █▀  █▄▀▀▀█ ███ █▀██▄  █▄▄▄▀▄█▄▀▀  █ █▀▄ █▄█▄▄ █ ▄█▄█████
████  ██▄▀▄█▀▀  █▄ ▀▀▄ █▄  ▀ █▀▀▄ ▄▀▀█▀▄█▀▄▀▄▄ ▄▄▄█▄ ▄▀▄█████
████▄ ▀▄▄▄▄ █▀▄ ██▄▀ █ ▄██▄▀██ ▄ █▄ ▄▀ █  ▄█  ▄▀▄ ▄▄██▀▄ ████
███████▄██▄▄▀▄▄▀▀▄ ▄▄███▀▄█  ▄▄▄ ▀▄▄█▀▀ ▄█▄▀█▀▀█ ▄▄▄  ▄  ████
████ ▄▄▄▄▄ █▄███▄▄  ▄█▄▄ ▄▀█ █▄█ ▀ ▀▄▄▄▄▄▄ ▄█▄ ▀ █▄█ █▀█▀████
████ █   █ █▀█▀▄ ▀▄██▄██▄  █   ▄ █ ▀█▄ ▀█  █ ▄▀█▄  ▄▄▀█▄ ████
████ █▄▄▄█ █▀▀▄▄▄█ ▄█  ▀▄▀▄ ▄▀ ▄▀▄▄ ▄█▄▀▄█▄▀ ██ ▄▄██▄█▄▀▄████
████▄▄▄▄▄▄▄█▄▄▄█▄▄▄███▄▄██▄██▄▄██▄█▄██████▄▄▄█▄█▄▄▄▄▄█▄▄█████
█████████████████████████████████████████████████████████████
█████████████████████████████████████████████████████████████
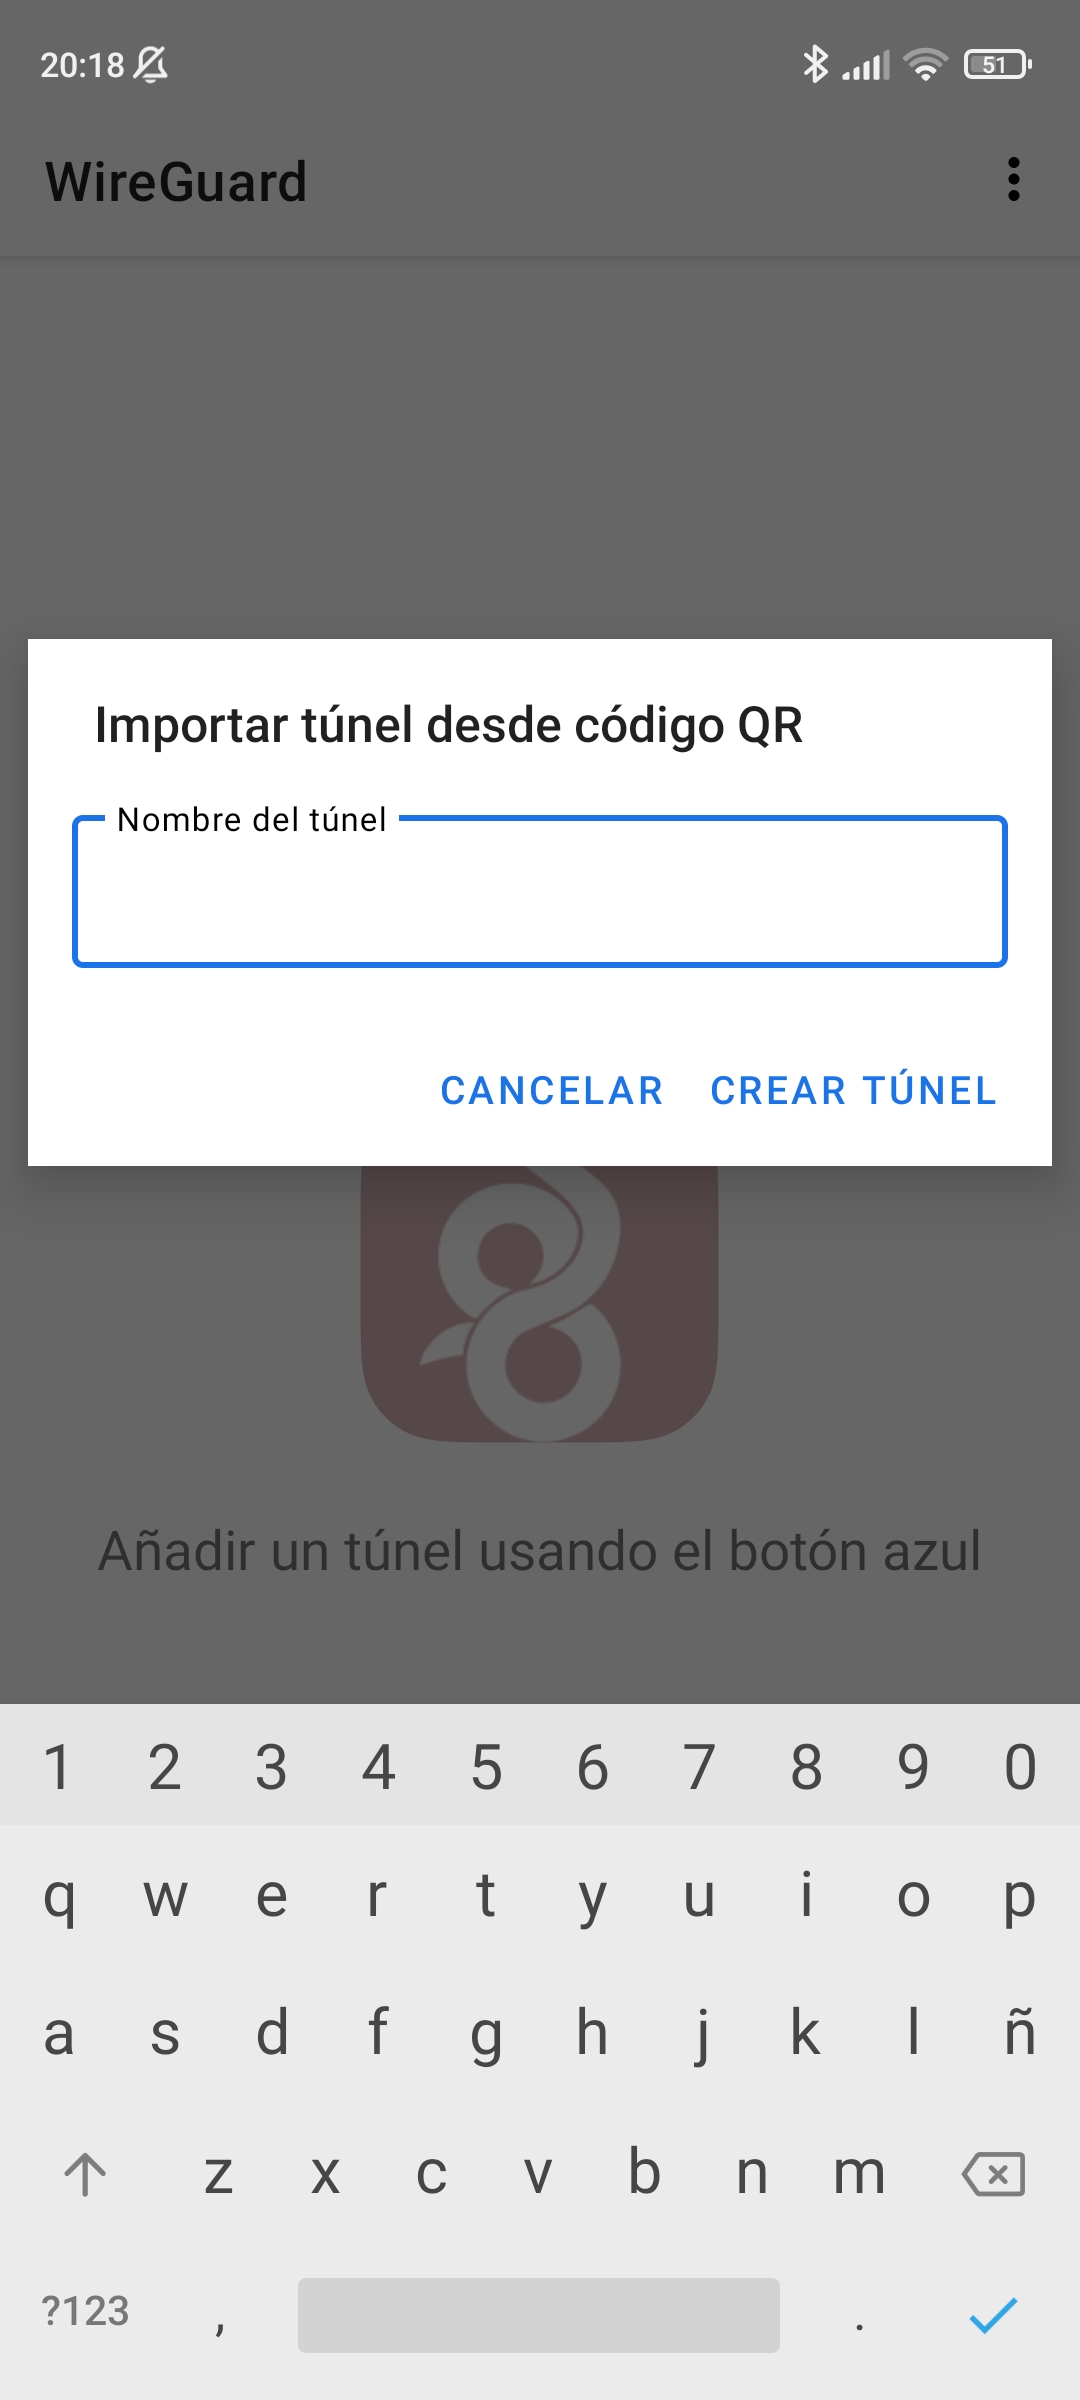
- Escaneamos el codigo y le ponemos nombre a la interfaz.
- Y vemos la interfaz activada.
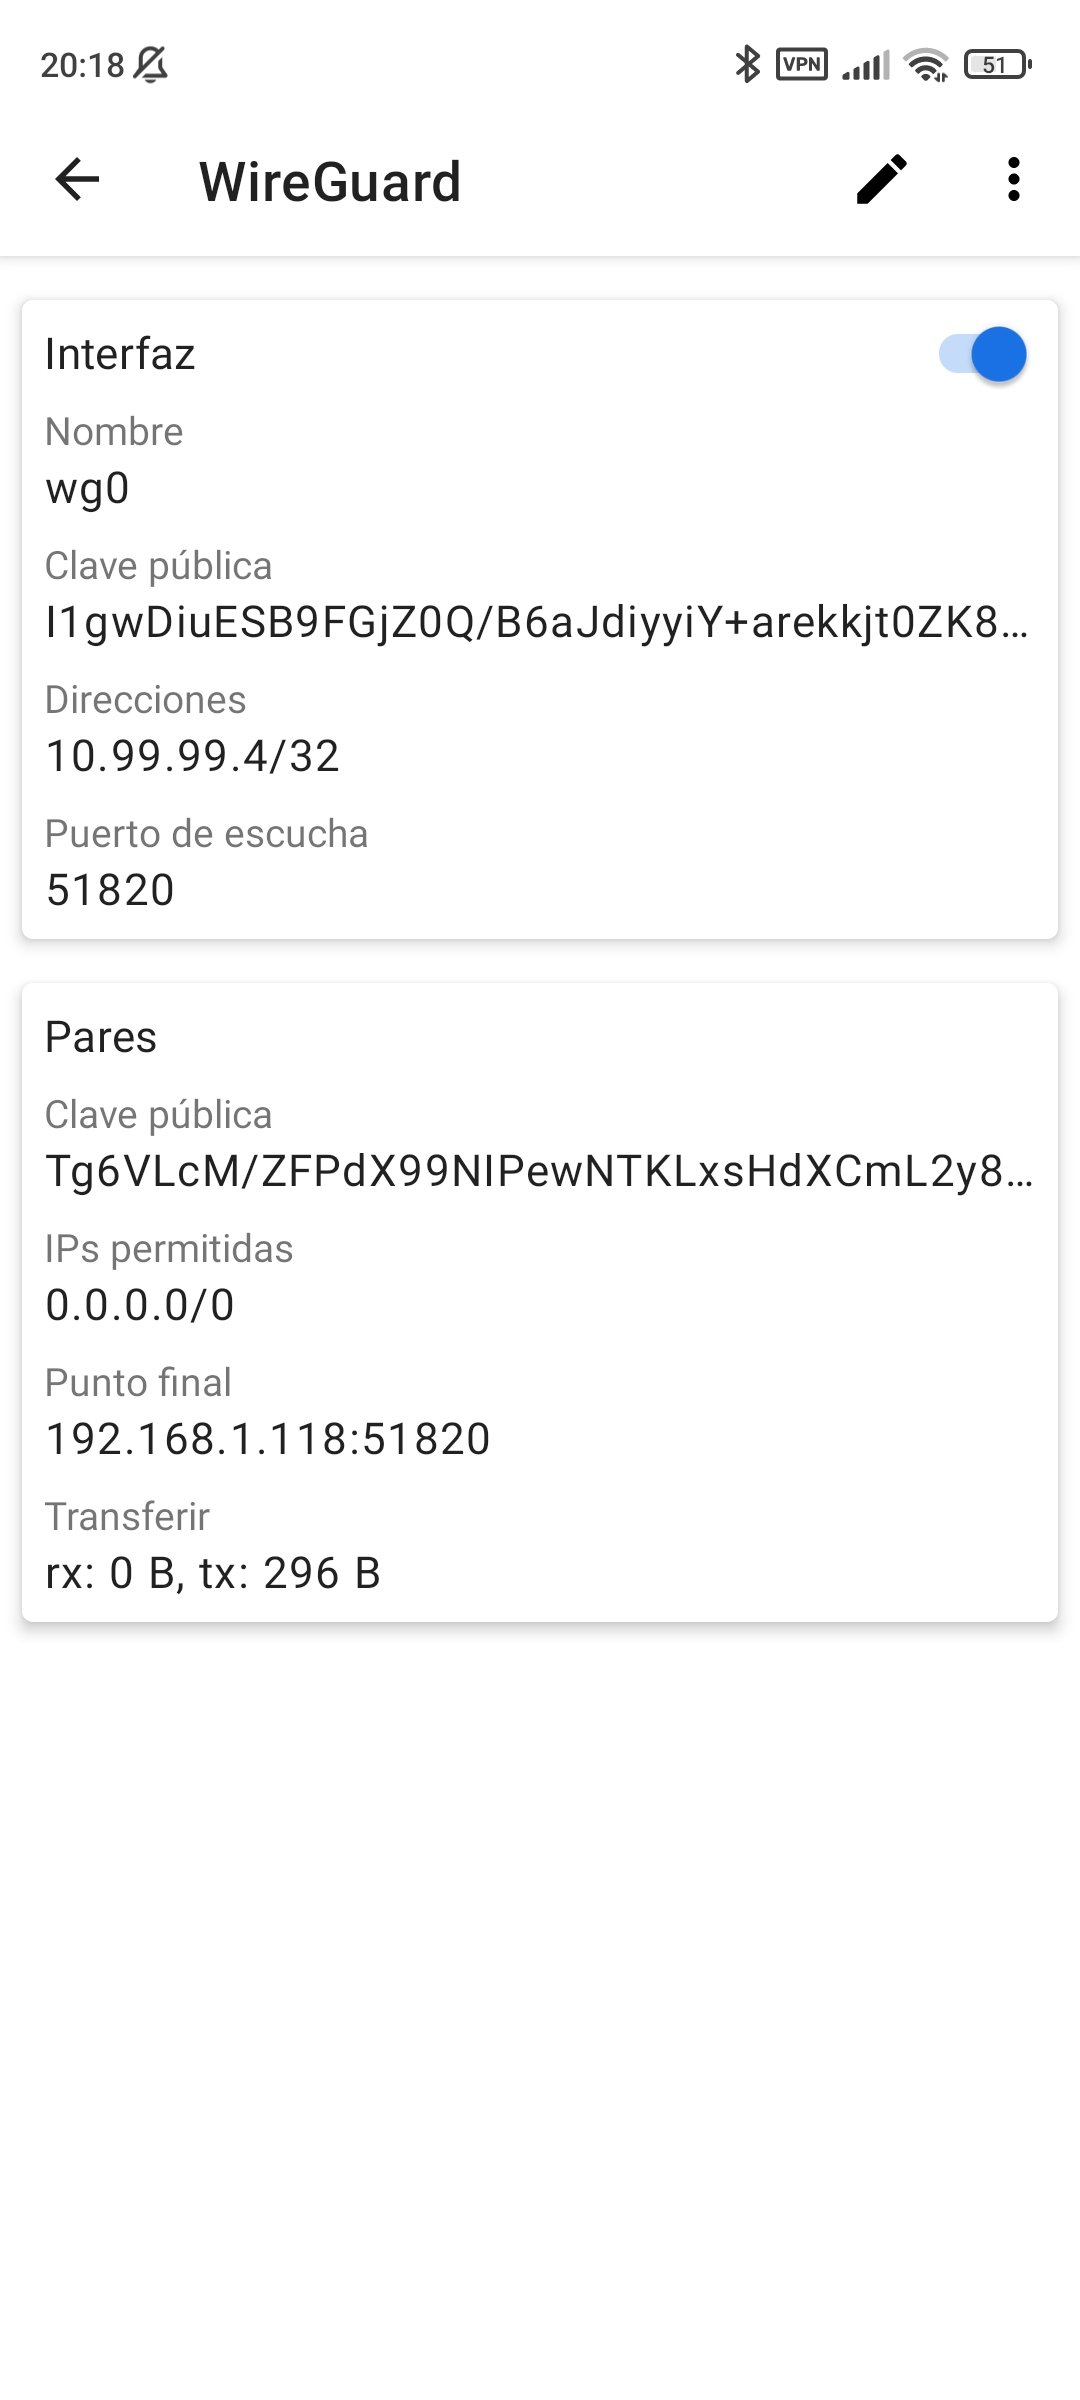
- Creamos el nuevo peer en el servidor
[Peer]
Publickey = I1gwDiuESB9FGjZ0Q/B6aJdiyyiY+arekkjt0ZK8FQI=
AllowedIPs = 10.99.99.4/32
VPN sitio a sitio con WireGuard.
- Tendremos el mismo escenario que usamos para hacer la VPN sitio a sitio con OpenVPN.
Servidor 1.
- Generamos el par de claves con wireguard.
vagrant@servidor1:~$ wg genkey | sudo tee /etc/wireguard/servidor1-privada.key | wg pubkey | sudo tee /etc/wireguard/servidor1-publica.key
Fsz5MIL2DGfbAZj+bDgUSFMltex7bhPLkQ+mYiq7mXI=
- Creamos la interfaz como hemos hecho anteriormente, aunque ahora tendremos que añadir unas reglas iptables para hacer forwarding, por supuesto tendremos que activar el bit de forwarding anteriormente.
[Interface]
Address = 10.99.99.1
PrivateKey = 8HT6kBnwZFn/XoG6GLhLMxtJwbxaBJE1ev4WJ6byFHw=
ListenPort = 51820
PostUp = iptables -A FORWARD -i %i -j ACCEPT; iptables -A FORWARD -o %i -j ACCEPT; iptables -t nat -A POSTROUTING -o eth0 -j MASQUERADE
PostDown = iptables -D FORWARD -i %i -j ACCEPT; iptables -D FORWARD -o %i -j ACCEPT; iptables -t nat -D POSTROUTING -o eth0 -j MASQUERADE
- Levantamos la interfaz.
vagrant@servidor1:~$ wg-quick up wg0
[#] ip link add wg0 type wireguard
[#] wg setconf wg0 /dev/fd/63
[#] ip -4 address add 10.99.99.1 dev wg0
[#] ip link set mtu 1420 up dev wg0
[#] iptables -A FORWARD -i wg0 -j ACCEPT; iptables -A FORWARD -o wg0 -j ACCEPT; iptables -t nat -A POSTROUTING -o eth0 -j MASQUERADE
Cliente 1.
- En el cliente solo debemos cambiar la ruta por defecto y apuntar a la ip interna del servidor 1.
vagrant@cliente1:~$ sudo ip r del default
vagrant@cliente1:~$ sudo ip r add default via 172.30.0.10
Servidor 2.
- Crearemos el par de claves para este servidor.
vagrant@servidor2:~$ wg genkey | sudo tee /etc/wireguard/servidor2-privada.key | wg pubkey | sudo tee /etc/wireguard/servidor2-publica.key
rq8H+vq7gIz1qosbDT4v50h/bTXVo7YVoPi564U3byc=
- Configuramos la interfaz añadiendo un peer con la ip publica de esta maquina y la clave publica del servidor 1.
[Interface]
Address = 10.99.99.2
PrivateKey = 2Bo+GwOmLyKzYpCmsXjY7sSRswEB478Y+0HXfDmhU1k=
ListenPort = 51820

[Peer]
PublicKey = Fsz5MIL2DGfbAZj+bDgUSFMltex7bhPLkQ+mYiq7mXI=
AllowedIPs = 10.99.99.0/24, 172.30.0.0/24
Endpoint = 192.168.121.8:51820
- Antes de levantar la interfaz volvemos al servidor 1, donde añadiremos un peer en la interfaz con la clave publica de nuestro servidor 2 y la red privada del mismo.
[Interface]
Address = 10.99.99.1
PrivateKey = 8HT6kBnwZFn/XoG6GLhLMxtJwbxaBJE1ev4WJ6byFHw=
ListenPort = 51820
PostUp = iptables -A FORWARD -i %i -j ACCEPT; iptables -A FORWARD -o %i -j ACCEPT; iptables -t nat -A PO>
PostDown = iptables -D FORWARD -i %i -j ACCEPT; iptables -D FORWARD -o %i -j ACCEPT; iptables -t nat -D >

[Peer]
Publickey = rq8H+vq7gIz1qosbDT4v50h/bTXVo7YVoPi564U3byc=
AllowedIPs = 10.99.99.0/24, 172.20.0.0/24
PersistentKeepAlive = 25
- Una vez hecho esto y reiniciada la interfaz del servidor 1 podemos levantar la del servidor 2.
vagrant@servidor2:~$ wg-quick up wg0
[#] ip link add wg0 type wireguard
[#] wg setconf wg0 /dev/fd/63
[#] ip -4 address add 10.99.99.2 dev wg0
[#] ip link set mtu 65456 up dev wg0
[#] ip -4 route add 172.30.0.0/24 dev wg0
[#] ip -4 route add 10.99.99.0/24 dev wg0
Cliente 2.
- Cambiamos la interfaz por defecto de este cliente tal como hicimos con el primero.
vagrant@cliente2:~$ sudo ip r del default
vagrant@cliente2:~$ sudo ip r add default via 172.20.0.10
Comprobaciones.
- Vemos las rutas del servidor 2.
vagrant@servidor2:~$ ip r
default via 192.168.121.1 dev eth0
10.99.99.0/24 dev wg0 scope link
172.20.0.0/24 dev eth1 proto kernel scope link src 172.20.0.10
172.30.0.0/24 dev wg0 scope link
192.168.121.0/24 dev eth0 proto kernel scope link src 192.168.121.8
- Ahora las del servidor 1.
vagrant@servidor1:~$ ip r
default via 192.168.121.1 dev eth0
10.99.99.0/24 dev wg0 scope link
172.20.0.0/24 dev wg0 scope link
172.30.0.0/24 dev eth1 proto kernel scope link src 172.30.0.10
192.168.121.0/24 dev eth0 proto kernel scope link src 192.168.121.86
- Ping desde el cliente 2 al cliente 1
vagrant@cliente2:~$ ping 172.30.0.15
PING 172.30.0.15 (172.30.0.15) 56(84) bytes of data.
64 bytes from 172.30.0.15: icmp_seq=1 ttl=64 time=2.017 ms
^C
--- 172.30.0.15 ping statistics ---
1 packets transmitted, 1 received, 0% packet loss, time 0ms
rtt min/avg/max/mdev = 2.017/2.017/2.017/0.030 ms
- Ping desde el cliente 1 al cliente 2.
vagrant@cliente1:~$ ping 172.20.0.15
PING 172.20.0.15 (172.20.0.15) 56(84) bytes of data.
64 bytes from 172.20.0.15: icmp_seq=1 ttl=64 time=2.531 ms
^C
--- 172.20.0.15 ping statistics ---
1 packets transmitted, 1 received, 0% packet loss, time 0ms
rtt min/avg/max/mdev = 2.531/2.531/2.531/0.031 ms